Finding products quickly is what every online shopper expects. If your WooCommerce store doesn’t have clear filters, visitors may lose patience and leave. Category filters make navigation simple, helping customers focus only on what matters. They also give your store a more structured and professional look. When you know how to add category filter in WooCommerce, the process is simple.
You just need to create product categories, assign them to each product, enable the “Show Categories” option in your filter plugin, and place the filter on your shop page using a shortcode. This setup helps shoppers browse products faster and improves store usability.
If you want your customers to enjoy faster and smoother shopping, this guide will help you get started. Continue reading to learn everything about setting up category filters in your WooCommerce store effectively.
How to Add Category Filter in WooCommerce?
Adding a category filter to your WooCommerce store is easier than it looks. With the help of a reliable WooCommerce Category Filter plugin, you can make it simple for visitors to browse your products by category without any coding experience. Let’s go through the complete process, from installation to configuration, using the Dynamic AJAX Product Filters plugin as an example.

Installing a Category Filter Plugin
The installation process is quick and straightforward. You can use either the free version from the WordPress directory or install the premium version manually from your Plugincy account.
For the Free Version
Step 1: Open the Plugins Section
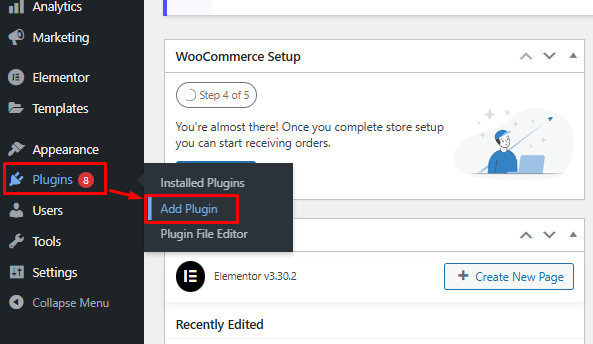
Log in to your WordPress dashboard and navigate to Plugins > Add New. This is where you can install plugins directly from the WordPress library.
Step 2: Search for the Plugin
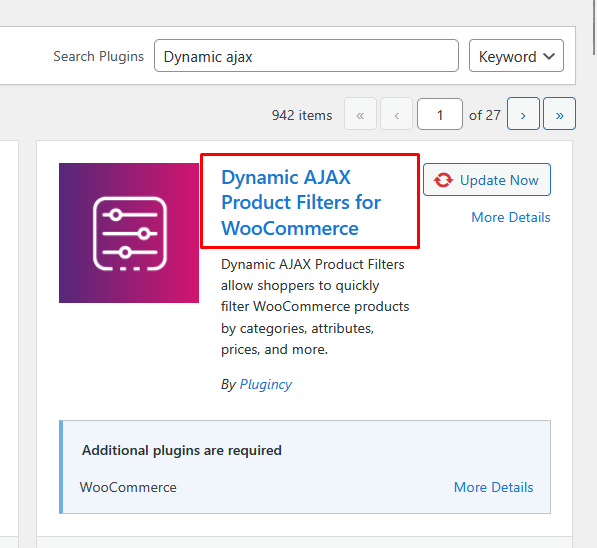
In the search bar, type Dynamic AJAX Product Filters. When the plugin appears in the search results, click “Install Now” to start the installation.
Step 3: Activate the Plugin
Once the installation completes, click “Activate”. You’ll now notice a new menu labeled “Product Filters” in your dashboard, ready for configuration.
For the Pro Version
Step 1: Download the Plugin File
After purchasing the Pro version from the Plugincy website, sign in to your account and download the plugin ZIP file to your computer.

Step 2: Upload the Plugin Manually
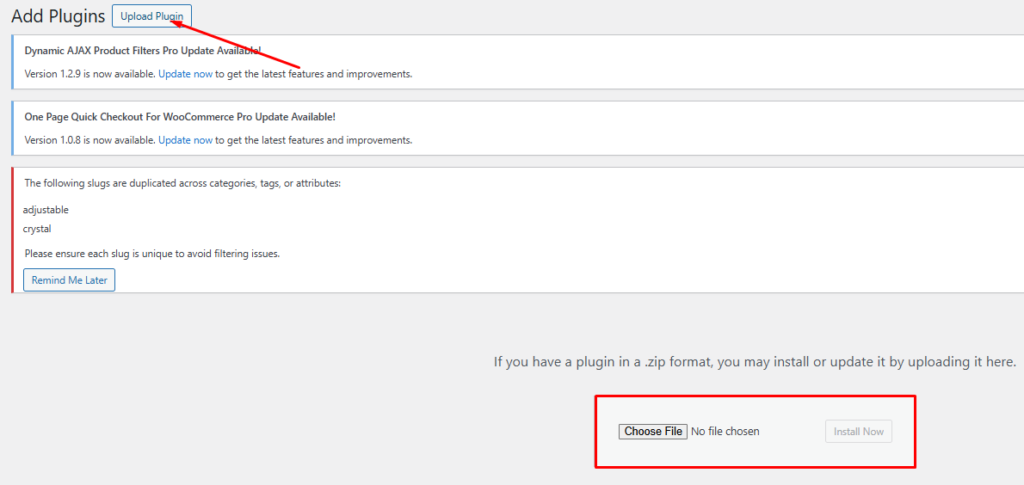
From your WordPress dashboard, go to Plugins > Add New and click “Upload Plugin” at the top. Select the ZIP file you downloaded, click “Install Now”, and wait for the installation to finish.
Step 3: Activate the Plugin
Once installed, hit “Activate Plugin”. The product filters option will appear in your dashboard menu, indicating it’s ready to use.
Configuring the Category Filter
After activating the plugin, it’s time to set up your product categories and display them as filters on your shop page. Follow these steps to make your filters functional and visually consistent with your store design.
Step 1: Create Product Categories
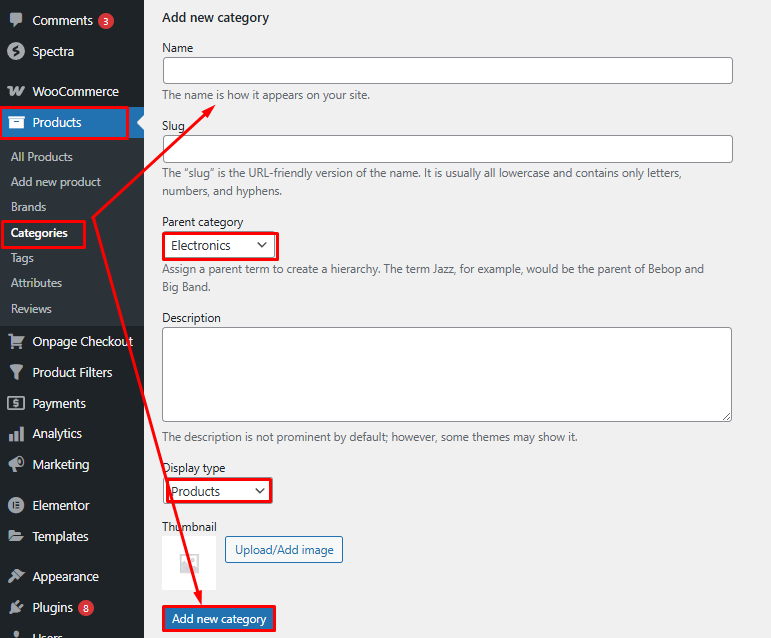
Go to Products > Categories in your WordPress dashboard. Add your desired categories (for example, Electronics, Laptops, Accessories). Include a name, slug, and short description if needed, then click “Add New Category”.
Step 2: Assign Categories to Products
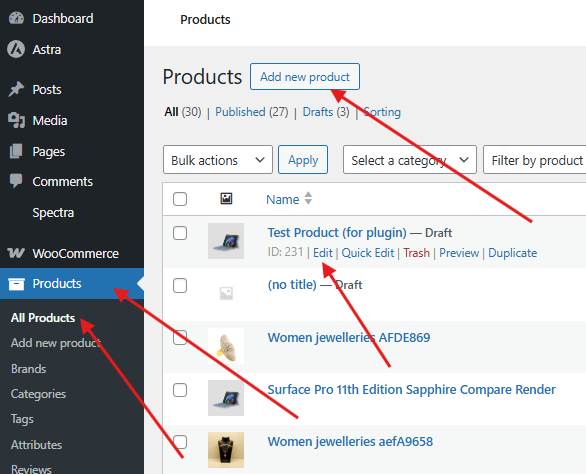
Open Products > All Products and edit each product. On the right side, tick the appropriate category box to assign that product. Save the changes so all items are properly grouped.
Step 3: Enable or Disable Categories in the Filter Widget
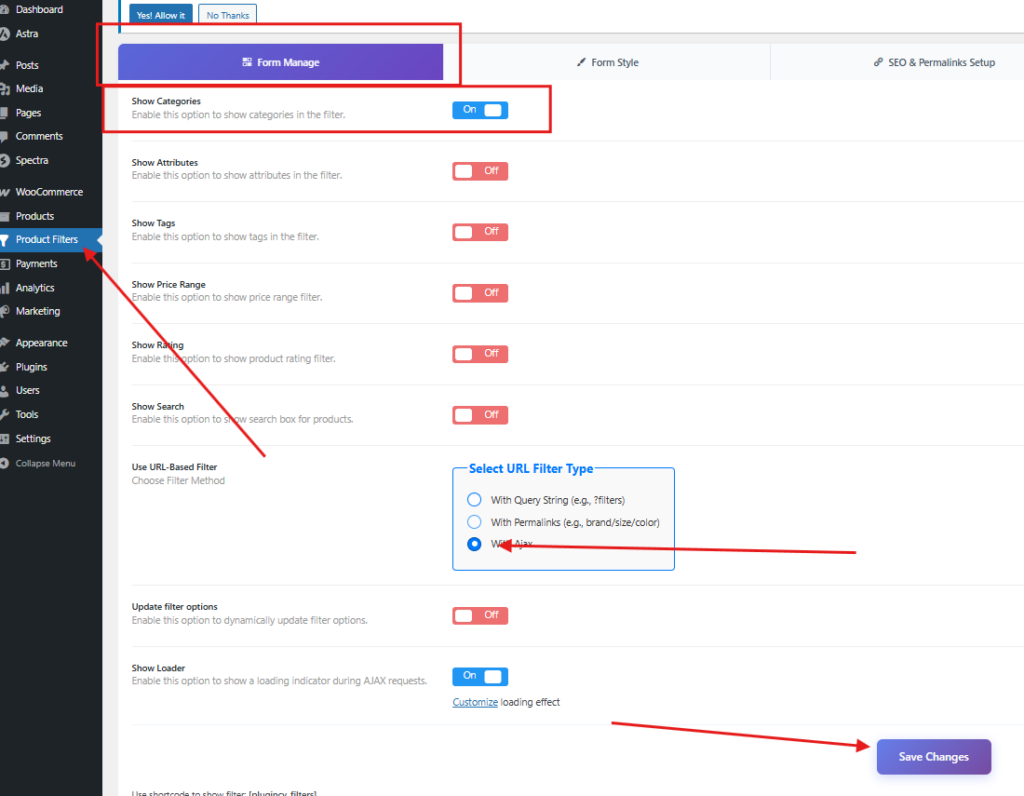
Head to Product Filters > Form Manage. Here, you’ll find the “Show Categories” toggle. Turn it on to display categories in the filter widget or off to hide them from the view.
Step 4: Customize the Filter Style
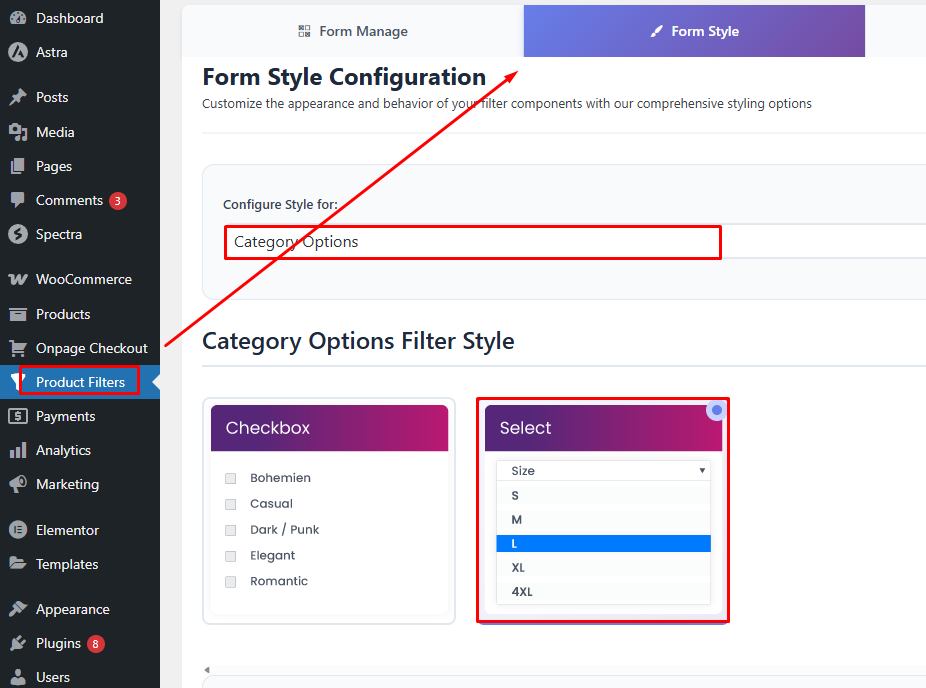
Under Product Filters > Form Style, adjust how your category filter looks on your website. You can change the layout, colors, and design to match your store theme. This ensures the filter fits seamlessly on both desktop and mobile devices.
Step 5: Display the Category Filter on the Shop Page
Navigate to the page where you want to display the category filter. Add the shortcode [[plugincy_filters]] in the content or widget area. To show products alongside the filter, you can also include the [[products]] shortcode.
By completing these steps, your WooCommerce store will now feature a fully functional category filter that makes shopping faster and smoother. Once everything is set up, shoppers can instantly narrow their choices, improving both their experience and your store’s overall performance.
How Category Filters Improve Shopping Experience?
A smooth shopping experience can make the difference between a visitor browsing and a visitor buying. Category filters play a big part in that by making navigation simple and organized. They guide shoppers to what they want faster and help reduce confusion. Let’s explore how they improve customer experience in real situations and practical ways.
Reduce Product Search Time
Category filters save time by narrowing down results instantly. Instead of scrolling through dozens of products, shoppers can click a category and see only what matches their interest. This quick access makes browsing less tiring and helps users reach the checkout page faster, especially when your store has a wide product range.
Boost Customer Satisfaction and Engagement
When customers find what they need quickly, they naturally spend more time exploring other products. Smooth navigation builds trust and encourages repeat visits. A well-structured filter system shows professionalism and care for user experience, keeping shoppers engaged and satisfied throughout their journey on your WooCommerce store.
Create a Better User Experience
A clear and responsive filtering system helps users feel in control. By choosing preferred categories, they can personalize their browsing without distractions. This not only improves navigation but also reduces bounce rates. A simple, functional category filter can turn a cluttered shop page into a more organized and enjoyable space.
Practical Example of a WooCommerce Store
Imagine an online clothing store using category filters like Men, Women, Kids, and Accessories. Customers instantly find their preferred section, choose styles, and view only relevant items. The result? Reduced search frustration and faster purchasing decisions, ultimately improving sales and overall store conversion rates.
Category filters shape how customers interact with your store. They create convenience, encourage product discovery, and add value to every shopping session. When properly configured, they not only improve satisfaction but also help your WooCommerce store perform better.
The Impact of Category Filters on Mobile Shoppers
Mobile shopping keeps growing every year, and users expect fast, simple browsing on every screen. A responsive category filter helps them find products quickly and improves store usability. Let’s explore how thoughtful mobile filter design can enhance shopping satisfaction and build a stronger WooCommerce experience for customers.
Importance of Easy Navigation
Mobile users prefer quick interactions. A clean, visible category filter helps them move between products without effort. With fewer taps and faster loading, shoppers can explore more categories and stay engaged longer, which often leads to higher conversion rates for store owners.
Common Issues with Poor Mobile Filters
Poorly optimized filters can frustrate customers. Buttons that overlap, filters hidden under menus, or slow-loading widgets make navigation hard. These design flaws cause users to abandon the store, lowering engagement and sales potential. Optimizing filters for mobile keeps users focused and satisfied.
Smart Filter Designs that Work
Features like collapsible panels, sticky sidebars, or simple icons improve usability on smaller screens. These layouts make filters accessible without crowding the view, offering a smooth browsing experience. Combined with responsive plugins, such designs help maintain consistency across all devices.
Category filters are crucial for mobile shoppers who expect comfort, clarity, and control. A responsive filter layout not only improves usability but also builds trust in your WooCommerce store. By offering quick, effortless navigation, you enhance both the shopping experience and overall customer satisfaction.
Tips to Make Category Filters More Intuitive for Shoppers
A well-designed category filter can make product discovery simple and enjoyable. Intuitive filters guide users smoothly through your store while reducing the effort to find what they need. Here are some effective ways to make your WooCommerce category filters smarter, clearer, and more user-friendly for every type of shopper.
- Limit the Number of Visible Options: Too many filter choices can overwhelm users. Keep only the most relevant options visible and let others remain hidden under expandable sections. This keeps the layout clean and helps shoppers focus on making quick, confident decisions.
- Use Clear and Familiar Labels: Labels should be simple and direct, like “Men’s Shoes” or “Size M.” Clear wording avoids confusion and ensures customers know exactly what they’re filtering for. Using familiar terms also helps maintain a consistent shopping experience.
- Group Filters Logically: Organize similar filters under one category, such as Size, Color, or Brand. Logical grouping creates an easy-to-follow structure, preventing users from jumping around the page. It helps shoppers locate options faster and keeps your store navigation intuitive.
- Add Visual Icons or Colors: Visual elements make filters more engaging. Small icons or color blocks for options like Red, Blue, or Black help customers identify choices instantly. These visual cues enhance usability and make browsing more interactive and enjoyable.
- Keep Filters Always Accessible: Place filters in a visible and easy-to-reach area of the product page, such as the sidebar or top panel. Shoppers should never have to scroll too far to refine their search, which ensures a smoother and more efficient experience.
Creating intuitive category filters is about combining clarity with convenience. By simplifying layout, organizing content, and adding visual cues, you help shoppers find products faster and enjoy a pleasant browsing journey. A thoughtful design leads to better engagement and stronger results for your WooCommerce store.
Common Issues While Adding Category Filters and How to Fix Them
Even with the best setup, category filters in WooCommerce can sometimes show unexpected problems. These issues may affect product visibility or break the filtering function altogether. Understanding what causes these errors and how to fix them quickly helps maintain a smooth shopping experience. Let’s go through the most common ones and their solutions.
Plugin Conflicts or Missing Attributes
Sometimes, multiple plugins running together can interfere with filter functionality. Conflicts may prevent filters from loading or showing correct results. Try deactivating other plugins one by one to identify the issue. Also, check if your products have correctly assigned attributes since missing ones can cause filters to display incomplete results.
Theme Incompatibility
Some themes may not fully support advanced filter structures. This can cause layout shifts, missing buttons, or filters appearing in the wrong place. To fix this, switch temporarily to a default theme like Storefront. If the filters work there, contact your theme developer for compatibility adjustments or use a plugin with built-in theme support.
Filters Not Showing Products Correctly
If filters load but fail to display the right products, it may be due to incorrect attribute configuration or caching. Clear your site cache and rebuild product indexes. Double-check that each product is linked to the right category and that “Used for variations” is selected in the attribute settings.
Seek Developer or Plugin Support
When basic troubleshooting doesn’t help, reach out to plugin support or a developer for assistance. Most plugins, including advanced WooCommerce filter tools, have dedicated help teams that can review your setup. Providing screenshots and error details often helps them diagnose and fix issues more efficiently.
Test Filters After Every Fix
After solving any issue, always test your category filters thoroughly. Use different devices and browsers to confirm everything displays correctly. Proper testing ensures customers get accurate search results, keeping the user experience consistent and professional across your WooCommerce store.
Troubleshooting category filter problems is part of maintaining a strong online store. Addressing issues like plugin conflicts, theme mismatches, or setup errors quickly keeps your site functional and reliable. Consistent testing and timely support help ensure your filters continue to deliver a smooth and accurate shopping experience.
When Should You Consider a Premium Filter Plugin?
Free filter plugins are a great starting point, but as your WooCommerce store expands, your needs also grow. To handle larger catalogs, faster loading times, and better customization, premium filter plugins offer advanced capabilities that elevate both user experience and store performance. Here’s when an upgrade makes sense.
Limitations of Basic Filters
Free plugins usually cover only the basics. They often lack features like multi-category filtering, AJAX-based updates, and advanced styling options. If your store requires smoother navigation, faster product loading, or a more polished layout, premium plugins provide those professional-grade improvements effectively.
Enhancing Speed and SEO Performance
Bigger stores with large inventories can experience slow loading times using basic filters. Premium plugins use optimized code and AJAX technology to improve site speed. Many also include SEO-friendly filtering structures, helping your product pages rank better and stay visible in search results.
Improving User Experience and Store Efficiency
Premium filters bring advanced design options, better responsiveness, and deeper customization. They help shoppers browse easily on any device while maintaining consistent performance. These upgrades enhance usability, extend browsing time, and ultimately increase conversions by keeping customers satisfied throughout their journey.
Choosing a premium filter plugin ensures your WooCommerce store runs efficiently while offering customers a smooth browsing experience. It’s a smart investment that supports growth, speed, and better engagement. Upgrade when your store outgrows basic tools and enjoy the long-term benefits of professional-grade filtering solutions.
Concluding Lines
A well-organized store creates a better shopping experience for customers. Knowing the process of adding a category filter in WooCommerce helps you bring clarity and structure to your product pages. It allows users to reach what they need faster while giving your store a more professional and user-friendly layout.
Adding a category filter is not just about navigation but about convenience. It improves search precision, reduces browsing time, and keeps visitors engaged longer. Whether you run a small store or manage thousands of products, filters help customers save time and make confident buying decisions.
By setting up filters properly, you improve usability, speed, and customer satisfaction altogether. Understanding how to add category filter in WooCommerce is a simple step that can make a big difference in your store’s overall success.